Save Water + Money: Detecting and Fixing Leaks

Leaky Faucet.jpg

Have you taken a serious look at your water bill lately? Higher gallons per month could indicate leaks. That means you’re paying for water that’s going right down the drain. To stem the tide, the Environmental Protection Agency recommends checking your home for the most common causes of leaks periodically.

Before looking for individual leaks, check your overall water usage by monitoring your water meter over a 2-hour period when no water is being used. Does the meter keep inching up? The good news is that many common leaks are easy and inexpensive to fix.

Where to Look for Leaks:

Toilet leaks. Typically, toilets begin leaking when the toilet flapper or valve seal becomes old or worn out. A good way to check is to put some food coloring in the toilet tank and wait 15 minutes to see whether color shows up in the toilet bowl. If it does, you’ll need to fix it. You can probably find the replacement part at your hardware store, but to be sure, take the old part with you for comparison.

If the leaky toilet is old, consider replacing the whole fixture. Older toilets can use four times more water per flush. You can get a new water-efficient one for as little as $100, and replacing an older toilet can dramatically reduce your water bill. 

Faucet leaks. Old and worn washers and gaskets are frequently the cause of faucet leaks. If you attempt to fix the leak yourself, remember to turn the water off under the sink before you begin. 

Showerhead leaks. Some leaky showerheads are easy to fix, while others may need professional attention. Make sure there is a tight connection between the showerhead and the pipe stem. You can use pipe tape, also called Teflon tape, to secure it. You may also need to replace the washer. If you suspect a valve leak, it’s time to call the plumber.

Outdoor leaks. Check your garden hose for leaks at the connection to the spigot. If it leaks, try replacing the washer to ensure a tight connection to the spigot. You can also use pipe tape and a wrench. If you have in-ground irrigation, you should check to make sure it wasn’t damaged by frost or freezing over the winter. If it leaks, it may need professional attention.

Suspected leaks. If you see signs of moisture or mold on your walls, ceilings, or floors, or you notice a musty smell, you may have a leak. Pipes could be leaking behind the walls, which requires the help of a professional plumber.


If any of your fixtures need replacing, look for the WaterSense label. Products with the label are independently certified to use at least 20 percent less water and perform as well as or better than standard models.


Sources include Consumer Reports and the Environmental Protection Agency

Houston Water Main Break

Thursday, February 27, 2020, Houston experienced a huge water main break that is impacting a massive area. As a result debris will be dislodged and may find its way into your home water system. You may notice a reduction in water flow in one or more of your fixtures. Jim provides a brief illustration of how to clear the faucets in your home.

Houston water main break map 2 28 20.jpg


New Texas Building Materials Law

AdobeStock_4069643.jpeg

House Bill 2439 went into effect in September bringing change to local building aesthetics laws.

The new law restricts governments from locally regulating building materials used in construction. National standards, with a few exceptions for things such as historical projects or storm protection, will apply to construction in Texas. HB 2439 does not pre-empt the authority of a homeowners’ association or planned developments to regulate aesthetics. If a developer or an HOA want to use deed restrictions to keep neighborhoods looking neat and consistent, they may still do so. However, it is unlikely that a city has any authority to directly enforce any deed restrictions.

The law received support from most state lawmakers and building industry associations, who said a more open market for building materials could result in lower construction costs for buyers and builders. Many foresee potential conflicts as the new law creates a challenge of balancing the look of modern homes and trends with the established visuals of older portions of a community.

While this law will certainly be challenged by cities throughout the state, homeowners who are looking to build using materials outside of city preferences now will have a leg to stand on.

Click here to review the complete bill text

Upgrading Kitchen Appliances with Resale Value in Mind

Here's some advice from the experts at DFW’s iconic retailer Gold Star Appliance & Lighting.

Over 60 years in business and one of the most frequently asked questions is

“What appliances will help me sell my home quickly, and for the most money?”


Here are a few things to keep in mind when buying appliances for your kitchen when you are planning to sell:  

1.) Stainless is the best choice for resale for any and every brand. 

Why? Stainless is timeless. The appliance industry has almost put to rest the almond and avocado green that is nearly impossible to match for the consumer. Stainless steel is versatile, and in terms of resale, it is able to be styled for the new buyer in multiple different ways. Stainless appliances are not the focal point of the kitchen, but instead a wonderful additive to the beauty of the kitchen overall. Stainless (in most cases) is normally a comparable price to black and white appliances as well, so don’t count it out if you are      budgeting. Ask your sales associate about sales, special pricing, and package rebates. You will be pleasantly surprised.

2.) Stay away from over computerized, smart appliances if you can, or study your neighborhood demographic heavily before making smart appliance purchase. 

Why? Smart appliances are beautiful and wonderful for the right consumer, but that is the catch...“right consumer...” If you plan to sell your home, putting a smart refrigerator with a computer on the front panel that has a $2500 and up price tag may steer away possible buyers. This is why we recommend studying your area. If your neighborhood is the hot spot for young couples and families, a computerized appliance may add value. However, if your neighborhood is high-end luxury, or filled with new retirees...keep it simple. High end luxe built-ins are made to be sleek and clean, and couples 45- up most often prefer a simpler appliance. There are multiple opinions on this subject, but from our experience, this is what works here in DFW. 

 3.) Upgrade from an over the range microwave/hood combo to a dedicated vent hood and build in a microwave if possible. 

Why? Kitchens start to gain a luxury feel when the microwave moves from above the oven. While that seems like such a small upgrade, it raises the value of your kitchen substantially. Your appliance and lighting specialist can speak with you about making the change in your cabinet, and if the option is good for you. This small $300-$400 upgrade could make your kitchen worth about $1000 more as long as you aren’t adding extensive cabinetry work and electrical to the mix. Do not be afraid to ask your Appliance and Lighting Specialist to come to your home and check it out. At Gold Star Distributor we do this for free. By coming out and checking over your kitchen for this upgrade, we can save you time and money before deciding if you want to spend the capital to bring out an electrician or cabinetry company to cut the hole. The process overall is extremely simple.

 4.) Upgrading to a gas range or range top from a slide gas range or a gas cooktop. 

Why? If you already have a gas cooktop or a glass slide-in range, the cost to upgrade to a commercial gas range isn’t a huge difference in price, but it is a phenomenal difference in the look and cooking ability. By getting a commercial-grade range you give your home buyer a heavy curb appeal, and much higher BTU’s. For example, you might put a Bosch kitchen package in, and a Thermador range top or range. All of the units will match, but that Thermador range top or commercial range would be the cherry on top that really makes your kitchen top tier. 

5.) If you are replacing the entire kitchen, keep all of the appliances the same brand. 

Why? By keeping all of the appliances the same brand, you are most often eligible for some fantastic rebates. We have seen rebates anywhere from $1000 - $6000 all due to staying within the same brand. The second largest reason... the handles on your appliances. Yes, we know it sounds crazy, but handles are a touchy subject for consumers and most consumers prefer they all match. Keeping all of your appliances the same brand gives the kitchen a cohesive look overall, keeps money in your pocket, and makes everyone happy.

6.) Lastly... Do not cut corners (unless you have to for fitting of course...) 

Why? When buying a home, kitchens sell. People spend most of their time in the kitchen with family, friends, etc. Build the price of your kitchen into selling your new home, and spend time with your Appliance and Lighting Specialist. Do not be afraid to ask a million questions to make sure you are really picking out the right package to sell your home, in the grand scheme of things, this should be an investment that will make you money. 

P.S. Not all appliances retrofit. 

From built-in refrigeration to range tops, specifications vary. Speak with your Appliance and Lighting Specialist if you are unsure at all. They are always happy to come out and measure free of charge. An awesome thing to do, no matter what company you are shopping with, take a picture of your current model numbers and bring them with you. Then, your Appliance and Lighting Specialist can match the sizing of your current appliances and give you the best feedback possible. 

We hope this helps in your kitchen remodel/resale process! Ask Gold Star Distributor more questions by emailing customerservice@goldstardistributor.com or call us at (972) 238-9541!

Make Your Home Elder-Friendly and Increase Resale Value

bathroom remodel floor and decor shower tub cropped.jpg

Aging in place may be the last thing on your mind when you’re renovating a home, especially if you’re under 50. But not considering design upgrades now could be a costly mistake in years to come.

We’re not talking about wheelchair ramps or shower grab bars, but “universal design” elements—eye-pleasing choices that make your house more livable for anyone at any age.

By using universal design, homeowners are better able to remain in their homes as they age. These design elements can also make a big difference if you lose mobility as you age. Remodeling projects that use universal design often result in a higher sale price for the house. “People are used to seeing these livable features in upscale resort bathrooms, spas, and other public spaces, so they read as desirable, and valuable,” says Kerrie Kelly, design expert for the real estate website Zillow.

Design Elements to Strongly Consider when Remodeling

Curbless Showers

A bathroom floor that continues straight into a walk-in shower without anything to step over is current standard at upscale hotels. 

Upstairs Laundry

If you are remodeling the master bedroom and bath strongly consider including an upstairs laundry. As much as you probably hate climbing the stairs with laundry now, imagine the process in 10 or 20 years.

Widened Doorways

Most shared living-space renovations include removing walls between rooms to open up the floor plan. But even when the walls can’t come down, widening doorways to at least 32 inches—preferably 36—can increase flow and livability.

Kitchen Flexibility

If you’re remodeling your kitchen, expand the pathways around the island to at least 48 inches wide instead of the standard 36, which is enough to accommodate party guests, as well as someone using a walker or wheelchair. Include varied-height work surfaces in addition to the standard 36-inch counter height, so work can be done while standing or sitting.

Doors and Lighting

Lever-style doorknobs are easier to use in old age. And by setting new electrical outlets 24 inches off the floor instead of the usual 12 to 18, you eliminate the stooping usually required to plug in a vacuum. Brighten up your home by adding recessed ceiling fixtures. Put them on rocker-style switches, which are easier to use; with a dimmer capacity, you can adjust lighting for different tasks.


Information provided by Consumer ReportsClick here for more information.

HOW TO BRING LIFE BACK TO OLD WOOD FENCE!!

Lisa with Ready Seal walked through the process of restoring life to an old wooden fence! It’s pretty simple!

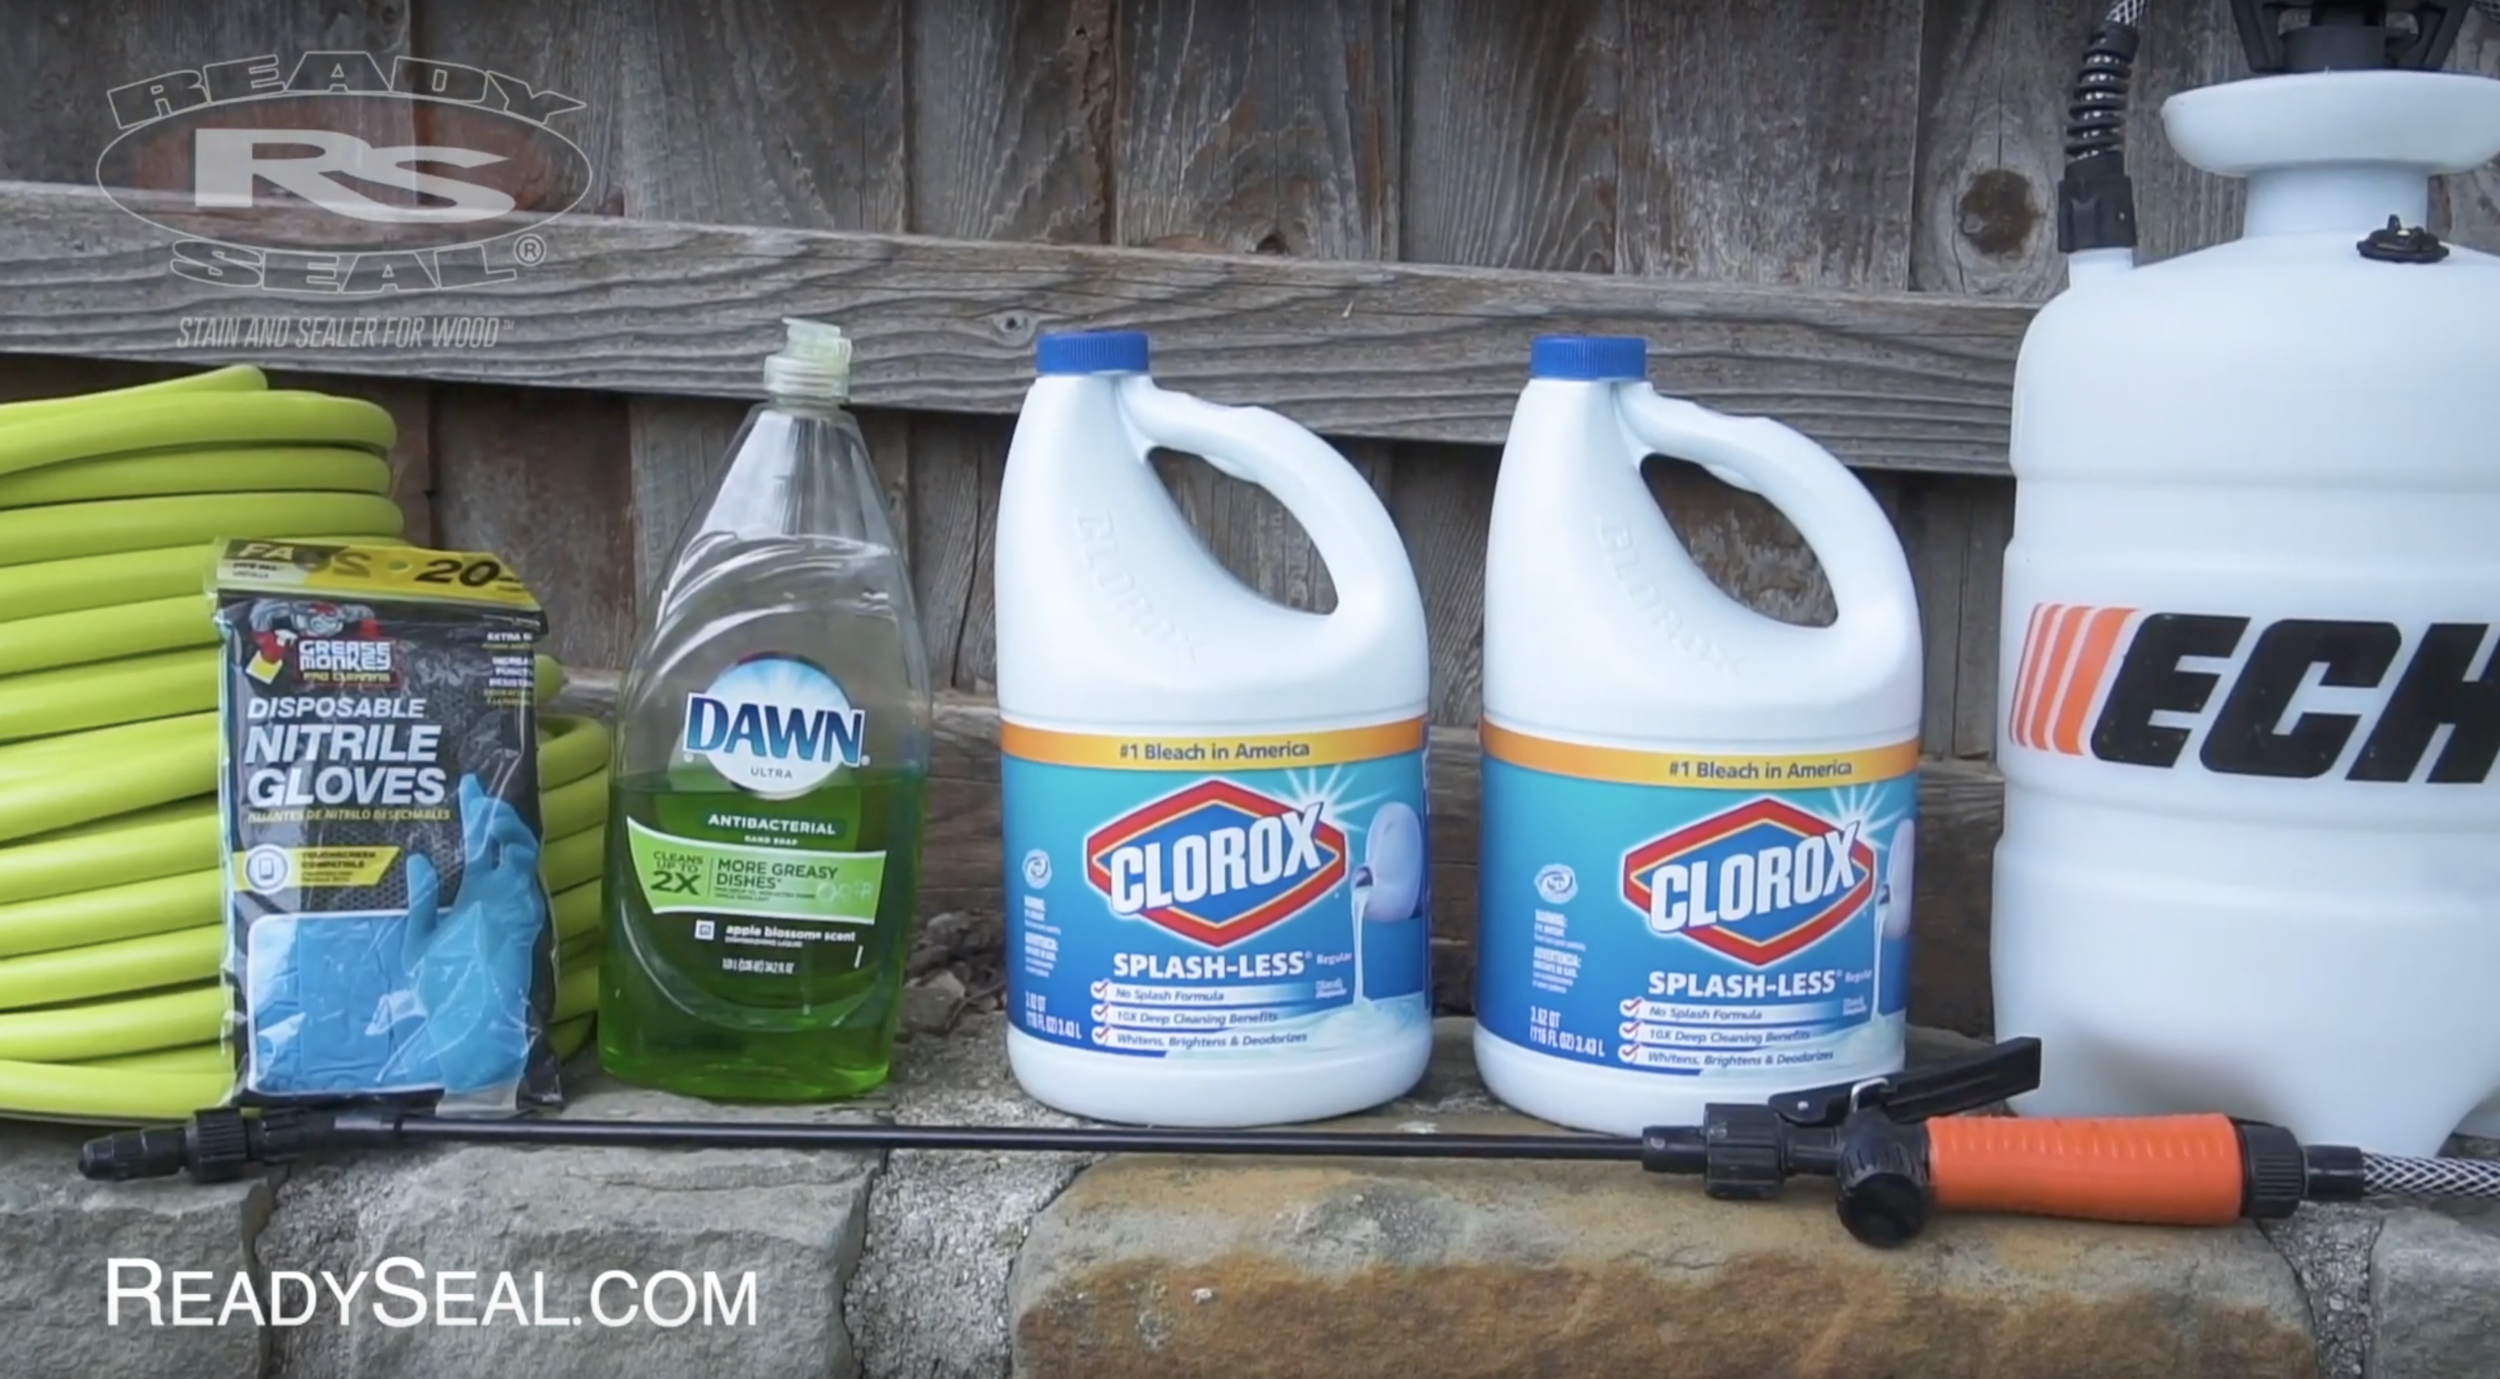
Here’s what you need

Screen Shot 2019-08-07 at 2.00.13 PM.png
  • Water

  • Bleach

  • Dish Detergent

  • Pump Up Sprayer

  • Protective Gloves

  • Ready Seal

  • Paint Brush

  • Paint Roller


Step 1: Create a mixture of water, bleach and dish detergent. You want to start with a mixture of 70% water and 25% bleach with a small amount of dish detergent.

Screen Shot 2019-08-07 at 2.03.05 PM.png

Step 2: Put your protective gloves on before using the pump up sprayer to spray the fence with the mixture.
Note: If you don’t see the wood lighten enough, strengthen the mixture by increasing the percentage of bleach to water until wood lightens immediately after application.

Step 3: Let the fence sit for about 20 minutes before rinsing off the fence with a hose. Let fence dry completely before applying Ready Seal.

Screen Shot 2019-08-07 at 2.01.04 PM.png

Step 4: Once fence is completely dry, apply Ready Seal with either a paint brush, paint roller, or a pump up sprayer.

Note: Ready Seal is self leveling so you don’t have to worry about applying it perfectly even. The important thing is to get the stain on the entire fence. It will soak in and create a lasting protection.

Step 5: Enjoy your fence! Once the Ready Seal is applied to the fence you don’t have to worry about it getting rained on because water will bead off the fence within minutes of application.

The Essential Guide to Texas Lawn Care

By Francesca Singer

Picture1.png


For a state known for being tough, Texas lawns sure are tender. Most Texans have a soft spot for the luscious, green yards that seems against all odds in this thirsty state. The trick to an enviable lawn is pretty straightforward: You’ve got to treat your lawn with TLC. Here’s the essential guide to Texas lawn care.


Build on a Solid Foundation

If you’re just getting started installing a lawn, you can ensure success from Day 1 by laying the right groundwork. Applying a layer of compost and tilling it into the top few inches of topsoil provides an ideal base for sod. If your established lawn is looking a little patchy, rent a core aerator and poke holes in the sod to help the soil breathe. Then, topdress with a healthy layer of compost. Rake it in well and give it a deep watering and see how fast your lawn thanks you.

Know Your Type

Your turfgrass type will have a lot of bearing on how you mow, so don’t overlook this critical detail. Most Texas lawns are Bermudagrass, Centipedegrass, St. Augustinegrass, or Zoysiagrass. St Augustine has a recommended height of 2½ to 4 inches while Bermuda should be cut to 1 to 2 inches. Know which grass type you’re working with and set your mower blade height accordingly.

Mow Like it’s Your Job

The truth is, mowing in Texas can feel like a job, because unlike up north, we have to mow for much more of the year. Texas grass goes brown and dormant during winter — even the mild winters of the Gulf Coast — but those winters are much shorter. Mowing is the key ingredient in a healthy lawn. It helps to control weeds and create the density we want. Never take more than one-third of the total height off at one time. Anything more stresses the grass and can leave it vulnerable to disease.


During midsummer peak growing season, you’ll need to mow at least once a week. In the summertime, raise the mower blade height to cut to the highest recommended length to help the grass survive the long, hot, dry months of summer. Also, take care to keep those mower blades sharp so that they cut, rather than tear the grass.


Water Right

Picture2.png

Source


Watering can be a touchy subject in drought years during watering restrictions. The truth is, most lawns don’t need to be watered as frequently as you might imagine. Your lawn will benefit from a long, deep watering once a week, far more than it will from two short, shallow sessions. The reason is simple: A long watering allows water to penetrate deep into the soil, and the grass roots will grow deep to chase it. The deeper the roots, the healthier the turf.


Most folks program their irrigations systems, but that doesn’t mean you can just forget about them. Do an annual water audit at the beginning of spring to make sure all the sprinkler heads are in good working order, there are no leaks in the line, and that water covers your lawn without wasteful overspraying. If you don’t have an automatic system, wait to water until you see signs of dehydration. If you walk across the lawn and the grass doesn’t immediately spring back, it’s time for a drink. If you’re not sure about watering, the extension office in your county has a daily update on water data for your area to help you calculate your irrigation needs.


Seasonal Care & Feeding

Most lawns in Texas need a little overseeding in the fall or early spring to fill in any sparse patches. Annual aeration can help to spruce up lawns that have had a lot of traffic. A little fertilization at the right time also goes a long way. If you use a 4-1-2 fertilizer, spread it sparingly twice a year. For the organic route, broadcast fine compost instead.


The goal of lawn care should always be the same: to spend less time working on our lawns so we can spend more time enjoying them. Get the lawn you want by sticking to some basic care routines, and then pull up a chair and enjoy the fruits of your labor.


Francesca Singer is a former farmer & landscape architect who is passionate about plants, DIY home restoration, and travel. When not writing, she can be found working in the garden, wrangling her toddler, or wielding power tools in Texas or rural France.


IF JIM WAS BUILDING A NEW HOUSE...

Frequent questions to the show include recommendations for Texans building a new house. Jim sat down and listed the key areas he would focus on when planning a new-build.

First, I would have a soils test done to determine the best type of foundation.  Too often we decide what we want the home to look like then try to make it happen on the lot we have.  You really need to find out from the soils engineer if it should be a slab on grade,pier and beam or block and base type foundation and then design the home from there.  If it is a slab on grade,I would use conventional rebar instead of post-tension in most cases.  I know most new slabs are post-tension, but I prefer the stiffness that the rebar gives me versus the cables.  Make sure to build the foundation up if it is a slab, too often the slab is put in and by the time the yard is finished you really do not have enough height to slope the soil away from the home adequately.

On the walls I would use standard 2x4 on 16-inch center constructions with plywood on the entire outside to provide stability. I would use a radiant barrier that is multi-layered over the plywood. When using siding instead of brick or stone, I would install furring strips then the siding leaving a gap on the bottom and top for air flow which is called skin venting. That will keep the walls cooler - just like being under a shade tree.

For insulation I would use spray foam in the walls and fiberglass bat insulation in the attic areas.  This allows me to have a good seal in the walls which have limited space. And, I can achieve the highest R-value and in the attic with fiberglass where I have ample room, and this will allow the home to still breath yet be energy efficient. Homes that cannot breathe must rely on the A/C to bring fresh air into the home and in too many cases you start getting sick home syndrome from mold because of higher humidity. If the A/C does not run enough to dehumidify you can have this problem.  Additionally, the A/C system must be sized properly for the insulation, types of windows, doors and the direction everything faces.

On the A/C system the current minimum rating allowed is 14 SEER, but I would get  an 18 SEER variable speed system. They ramp up and down according to the load and do a really good job of dehumidifying. Another system to consider is the mini-split where each room has a head unit and you can control the temperature room by room.  These systems have been in Europe for decades and are growing in popularity here in the last 10 years. The mini-split or ductless systems work fantastic and are the most energy efficient systems you will get right now.  

For a water heater go with a tankless. When looking at them you want a very efficient system, I like the heaters that use PVC to vent instead of stainless steel because you have less heat loss and that means increased efficiency. 

My water lines would be PEX. They are easy to install and very durable. They really have no down side.

On the roof again it would be 16-inch centers on the rafters decked with plywood, not chip board, and again a radiant barrier. Then the finished home’s outside would be protected by a radiant barrier for energy efficiency all the way around. The style of home and the weather patterns where I was building would determine the type of roof I would put on the home.

The windows are pretty much regulated by the government for energy efficiency, so you would be making your selection based on what is esthetically pleasing.

When you plant your trees keep them as far away from the home as you can. Remember the trees will grow and so will the root system which can cause problems for your foundation later.

These are the basics I would start with…….Happy Building!

If Your Screens Can't Do This.....You Might Need To Get New Ones

We’re excited to be partnering with Tommy Davidson at Security Screen Masters because they aren’t just great screens, THEY KEEP YOU SAFE!

These screens are seriously strong! They can withstand a major league fastball and it would take special equipment to cut them. But they aren’t just strong, they can also stop up to 66% of the sun’s heat. This helps cut your energy cost.

Tommy will create custom screens for your windows, doors, and outdoor patio enclosures to make sure they fit your home perfectly!

Get more information here!

Where Can You Buy STIHL Tools?

ms170_act_1001_r1.png

So you’re looking for the right STIHL tool and you’re looking for the the right place to buy it. As you probably know you can’t buy STIHL tools online and you won’t find them in box stores. So where do you go to find the STIHL tool you’re looking for? An authorized STIHL dealer.


You’ve probably driven by many of these dealers every day without realizing it. Most of them are smaller shops and don’t stand out like the box stores. The reason STIHL works with these dealers is because they are the best of the best when it comes to power tools. Most of these shops have been around for decades and have seen just about everything when it comes to equipment.

 
stihl_ak_system.jpg
 

STIHL works with them to make sure that their customers are taken care of the right way. It has ensured that STIHL continues to be the best. So how do you find the right dealership for you? Well if you’re in DFW you’ve come to the right place. Texas Home Improvement has partnered with a select number of STIHL dealers in the Dallas and Ft Worth area. Wherever you are, we have one near you. You can find the nearest dealer by clicking here.

Are STIHL Battery Powered Tools Any Good?

Battery powered power tools are taking over the homeowner market. STIHL launched a line of battery powered tools specifically designed for homeowners. The AK series in particular is designed for the weekend warrior and has a battery that works with the entire line of tools. I’ve tested out most of the tools in this line and I think they are carrying on the STIHL reputation really well.

One of the most important parts of buying a power tool is making sure you’re working with someone who knows the tools. That is one of the most valuable aspects of buying a STIHL tool. You can only buy the tools from an authorized dealer. These dealers know all of the options available for homeowners and can help you decide which one is right for you.

We’ve put together a select group of full service STIHL dealers in DFW that are the best of the best. You can find a dealer near you here.

STIHL AK Series Tools Reviewed
- RMA 460 Lawn Mower
- FSA 56 Trimmer
- HSA 56 Hedge Trimmer
- BGA 56 Blower

STIHL FS 56 RC vs FSA 56 STIHL TOOL BATTLE!!

I put a gas powered STIHL trimmer up against a battery powered STHIL trimmer. The gas trimmer is the STIHL FS 56 RC. The battery powered trimmer is STIHL FSA 56 which is part of the AK series of homeowner tools.

The test I put together was pretty straight forward. I cut opposite sides of an overgrown drainage ditch with each trimmer. I wanted to see how they handled the same job. I was looking for a couple of things with this test.

1st - Does the FSA 56 battery trimmer have enough power to do the job.
2nd - How comfortable are the trimmers to use.
3rd - Is the FS 56 RC significantly more powerful than the FSA 56.
4th - Which is easier to use.
5th - Which would I pick for a homeowner

At the end of the test I came to a pretty clear answer.

Let me know what you think about these tools!

The Right Way To Do A Major DIY Home Remodel!

Frank Shelton with UBuildIt talked to us about how you can do a major remodel yourself.

There is a great option for doing a major remodel on your house that most people don’t know about. Instead of grabbing a hammer and doing it all yourself or calling an expensive general contractor to do it for you, you can split the difference.

UBuildIt has a fantastic program for remodeling that allows you to be in control while giving you the peace of mind of having the expertise of an experienced contractor.

What Are Some Benefits

  • Save up to 30-40% off the cost of working with a general contractor

  • You have more control over how the project turns out and can make adjustments as you go.

  • Planning, advice, and site visits during the remodel from the UBuildIt team to make sure everything is going correctly.

The UBuildIt system is a fantastic option that you need to consider before you start your next major remodel!

Stihl Chainsaw Battle - Electric vs Gas

Stihl MSA 120 C Electric Chainsaw

vs Stihl MS 180 C Gas Chainsaw

In Episode 1 of our TV Show we had our first Tool Battle!

We wanted to see how the Stihl MSA 120 C Electric chainsaw stacks up against the Stihl MS 180 C Gas powered chainsaw in a homeowner sized job.

A lot of people have questions about whether Electric tools can keep up with their gas counterparts. This is magnified when it comes to chainsaws. We wanted to see for ourselves how it stacks up.

The battle consisted of cutting up a couple of small trees and seeing if the MSA 120 C could keep up. The results were a bit surprising.

Ghosting Doors and Cracks In The Concrete - Jim's Got The Answers

Check Out Two of Jims Segments From Episode 1 of Texas Home Improvement the TV Show!

 
  1. How To Fix Ghosting Doors

If you’ve got a door that won’t stay open you might have a “ghosting door.” Jim explained how to easily fix this issue with a couple tools and a garage floor.

2. Do Cracks In Concrete Always Mean Foundation Problems?

A lot of people think that if they see cracks in their concrete it always means foundation problems. But that’s not actually the case. Jim explains how some cracks are absolutely normal and nothing to be worried about while others can mean problems exist.

Chris Put A Garden On His Roof!!

Did you know you could turn your roof into a garden?

Chris Arrington with Arrington Roofing talks about how the roofing industry has changed in the last few years. The technology has grown to the point where you can put a garden on your rooftop which is exactly what Chris did at his Dallas office.

He turned his roof into a place to entertain, relax, as well as make money because of the solar panels he has next to his garden. It really is amazing how much has changed in the roofing industry and what is possible now.

Want more information about rooftop gardens? Or maybe you just need an experienced and trusted roofer.

Either way you should contact Arrington Roofing here!

Episode 1 of Texas Home Improvement the TV Show!!

Check out episode 1 of Texas Home Improvement! This episode has a series of quick segments on a variety of topics!

Get In Contact With The Experts From Episode 1!!


Topics Covered!

  • Radiant Barriers

    • Jim explains how radiant barrier works and why it’s a great DIY for home owners!

  • Rooftop Gardens!

    • Chris Arrington with Arrington roofing talks about how the technology in the roofing industry has changed dramatically allowing for some pretty exciting options. Including a rooftop garden!

  • Hawthorne Tables

    • Jacky Hawthorne talks about how he started Hawthorne tables and what makes them a unique and beautiful kitchen island option.

  • Cracks In Concrete Driveway

    • Jim answers a question about whether you should be worried about the small cracks in your concrete that show up over time.

  • Stihl Chainsaw Battle

    • We put two Stihl chainsaws up against each other. One electric and one gas. We wanted to see if the electric saw could hang with the gas powered saw.

  • Tankless vs Tank Water Heater

    • Thinking about getting a tankless water heater? Jim explains why he is such a fan of tankless water heaters.

  • DIY Home Remodeling

    • Before you hire a contractor for that major home remodel, check out what Frank Shelton has to say about the benefits of being your own GC.

  • Fixing A Ghosting Door

    • Have a door that closes itself? It might be a ghosting door and there’s an easy fix for that!

  • Design Challenge

    • We challenge Shellie Stewart with Floor and Decor to help us fix a hypothetical design problem that many homeowners face when updating their bathrooms!

  • Is Aluminum Wiring Dangerous?

    • Jim explains why people think that aluminum wiring is dangerous and what you can do to make sure that you don’t have any problems if you have aluminum wiring in your home.

The "Before" - Stihl Robot Lawn Mower

The “Before” Video

I wanted to create a video to show you what my yard looks like “before” I’ve really seen the benefits of the iMow. I’ve already had the iMow for a couple weeks so it’s already changed my yard a bit but this process is really about how it helps my yard going into next year. There are some pretty big potential benefits that I’m hoping to see so I wanted the before videos to be as honest as possible. No crazy overgrown yard or anything like that.

This journey will take a while but hopefully you’ll stick around and watch! For more information about the iMow contact Plano Power Equipment!

For more information about the Stihl iMow please contact Plano Power Equipment!

I Got A Robot Lawn Mower!!

Stihl iMow

Recently Stihl and Plano Power Equipment came out to my house to install an iMow robot lawn mower in my yard. I will be documenting how the iMow handles the uneven landscape and sandy soil that exists at my house. This is not a paid endorsement they gave me the iMow to test out and I will be sharing my real life experiences with it!
Feel free to reach out to me directly if you have any questions about the iMow or you can reach out to the amazing staff at Plano Power Equipment (972) 423-5220

STEP ONE - THE INSTALLATION

I have been push mowing my lawn for the last year and a half and it’s meant 2-3 hours a weekend spent sweating out in the yard. I didn’t get a riding lawn mower because the undulation in my yard would mean scalping it or uneven grass.

The installation process with Plano Power Equipment was incredibly smooth and straight forward. They came out to my house, we walked the yard and decided exactly where I wanted the iMow to mow. Once we had that decided they began installing the perimeter. This is done with a cable laying machine that installed the perimeter wire in the ground around my yard as well as two trees. This process took approximately two and a half hours. We hooked up the docking station to a power source and the iMow was ready to start learning my yard. I will be adding new posts as I watch how the iMow handles my yard.

Get more information about the iMow by contacting Plano Power Equipment

The Stihl Robot Lawn Mower Is Amazing!!

"I was really excited to follow up with Rodney Behrends about how his iMow robot lawn mower had been working for him. I couldn't have been more impressed!"

I went over to Rodney Behrends house to follow up on a previous video we did showcasing the Stihl iMow robot lawn mower. Rodney is the regional sales manager for Stihl. He had the robot installed so that he could see for himself how the mower worked and if the benefits really did meet with what Stihl was saying about the mower. 

Some of the benefits that are supposed to come along with this mower are.
- Healthier Lawn
- Less Watering Needed
- Fewer Weeds
- Thicker Grass
- Less Time Spent Maintaining Lawn

After a full spring and summer season Rodney was ecstatic to let us know that the iMow has been as good as advertised. You can see for yourself how healthy and strong his yard has become this year. 

The Stihl iMow Retails for $1,299 for the smaller option and $1,999 for the larger mower. 

You can get more information about the iMow at your local Stihl dealer.